Layer Manager
Drawing|Layer manager
Short key: Ctrl + 1
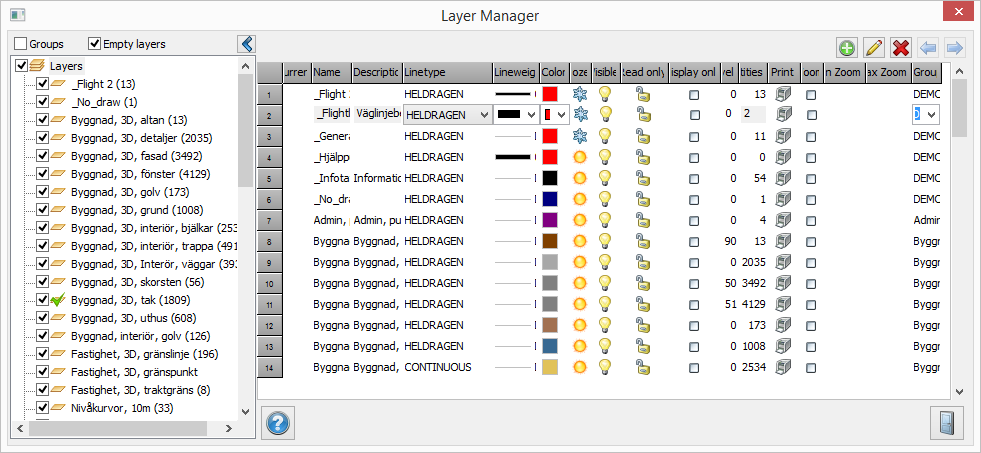
Layers are one of the many ways to distinguish between different types of data in Topocad. A layer can consist of buildings, pipes, cables, polygon points, survey 1 etc... Using layer control is an effective way to handle different types of data. The layer manager is a toolbox, in other words it can be open while you work with the drawing.
The Layer Manager is one of several ways to separate different types of data in Topocad. A layer may for example consist of buildings, roads or trees or may also have completely different classifications. The benefits of sorting different types of data in different layers are many. For example is it possible to turn on and off the type with a single command. Also, you can arrange the different codes (wall, middle of the road, curb, etc...) into different layers and you can in your drawing ignite or extinguish everything related to the code about to do. It is possible to select multiple layers simultaneously, for example, mark them as frozen simultaneously.
Working seamlessly with Layer Manager
Layer Manager is a toolbox, that is, you can leave it out while working in the drawing. If you want to change the size of the dialogue, you can click the button marked << above the layer list.
See also
Layer collections: create a list of the layers you want visible at the moment. A very quick way to turn layers on/off.
Attributes and Properties of the Layer Manager
Double-click a layer to display the layer's attributes and properties. In the Properties tab are sub-types, styles and objects.

It is possible to work with layers in several ways. These will be explained here.
To create a new layer:
- Activate layer control.
- Click on the button Create down to your left. Enter the name and description. The layer can have any name. Note that other CAD programs may not allow spaces or accented characters such ad Å, Ä, Ö.
Settings
Current
Select which layer will be the current layer. This can also be done in the menu. A quick way to select a current layer is to double click the layer name in the list to the left of the layer control window. The current layer will be displayed with an arrow to the left of it in the status list.
Name
Choose any name to the layer, but remember that it may change when exporting to other drawing files.
Description
The layer can have a description.
Line type
Select which line type you want to use for the layer. Note that the point code may have a different line type. If this is the case, the line type of the point code will be the active one.
Line weight
Select line weight for layer.
colour
Select which colour you want the layer to have. If you have already made settings e.g. in. the code table you do not have to do so again.
Frozen
Yellow mark means not frozen and snowflake means frozen layer. A frozen layer is not visible and cannot be regenerated. The good thing about working with frozen layers is that it is much faster, compared to hidden layers. This is because they are not included when regenerating the drawing.
Function to easily freeze layer: Activates by clicking the button or from right click menu. If the command is activated, all the layers the user clicks on will be frozen. The command terminates when clicking Escape or Return or by activating another command.
Visible
The visible layer is marked with a yellow lamp when it is visible and a grey lamp when it is hidden. A hidden layer is not visible but will regenerate when the drawing is regenerated.
Read only
Read only is marked with a lock which can be locked or unlocked depending on its status. A read only layer is visible but although you can snap on it you will not be able to change anything in the layer.
Display only
Display only is marked with a cross in the square. The layer is visible but you cannot work in it.
Layer level
The layers can be stated in different levels where the higher the level shows higher in drawing. In a similar way as order but on a layer level. The layer level has a higher priority then what the object order has.
Zoom alternatives
A layer is visible only within certain zoom limits (zoom= the drawing width in meters).
- On: the layer displays only within certain zoom limits.
- Off: The layer is displays only if it is selected as Visible in the layer manager.
- Min zoom: the minimum zoom where the layer is visible.
- Max zoom: The maximum zoom where the layer is visible.
Blank values on Min zoom and Max zoom are not valued as limits.
Current zoom in drawing is displayed at the scaler if settings has been made under Settings|System settings|Screen|Display zoom and if the scalor is visible.
Object
The number of objects in this layer.
Print
Select which layers you would like to print.
Group
Layer groups gives possibilities to set a group name on a layer. In the layer manager you can choose if layer groups shall be displayed and if all groups shall be displayed or just one group.
The title row of the group includes the group name, if the group is expanded or not, numbers of layers and number of objects i all the layers of the group. Click on the title to expand/close the group.
Layer preferences as frozen, visible, read only and display only can be changed for an expanded group by clicking in the respective column in the title row of the group.
There is also a possibility to select a group for layer for import/survey in the code table.
Commands
Create
Creates a new layer and a description can be made.
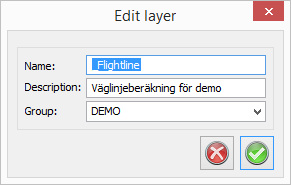
Edit
Gives you a possibility to edit the name of the layer and description.
WMS
WMS (Web Map Services) are maps on different servers. These can be used in Topocad by entering the search path, storage, format, version, request, SRS (coordinate system) and image formats.
Delete
Deletes a layer. If the layer contains an object you will be warned.
Previous/Next
Displays previous and next made layer setting.
See also:
Object properties
Change Properties