Quick outer slope
Section template|Quick outer slope
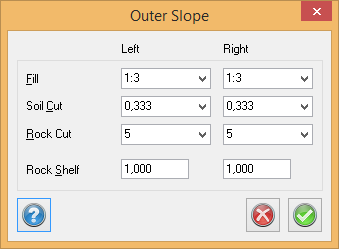
The Quick outer slope command edits the rock, soil and fill slopes on the left and right-hand sides. A rock shelf can also be entered. Every outer slope can contain several points and to separate the theoretical layer and the terrace in the outer slopes.
The default settings are:
- Rock intersection: 05:01 Red
- Soil intersection: 01:03 Green
- Fill intersection: 01:03 Blue
- Rock, shelf: 1 m Red


A complete section template shall have outer slopes defined for rock, soil and fill on both the right and left side. Which outer slope used for a side in a section calculation is determined by the place of the slope edge. In this case, slope edge is the end point on the theoretical layer. If the slope edge is placed under the rock model but, the rock slope is used. If the slope edge is placed under the soil model (but above the rock model), the soil slope is used and in remaining cases the fill slope is used. If a rock model is not used the soil slope is used for everything under the fill.
Define outer slope
To define an outer slope you have to select which slope you want to start with. As a suggestion; start with the outer slopes in the theoretical layer. To define for example the theoretical layer for left rock click on "Left rock" and "Theoretical".
Insert
Adds a new point inside selected point.
Add
Useable if the outer slope is selected. Adds a new point at the very end of the slope.
Delete
Deletes selected point.
Previous and Next
To move between the points on the outer slope, use the Previous and Next buttons. Next selects adjacent point, situated furthest from the middle, while Previous selects adjacent point closer to the middle. It is also possible to select a point by clicking on it in the view. Selected point is marked with an x and data for current and Next point is displayed in the dialogue.
The points on an outer slope can be divided up in three types: Relative, Connect and Follow
Relative
A Relative point means that the next point will have a place relative to another point. Which point this will be shall be written in the field "Rel. Id". This value can be written, and also added by clicking at Pick and then at the point in the view. If "Rel. Id" is -1, which is the default value, the position is stated in relation to current point.
Connect
A point of the type "Connect" connects to either rock, soil or theoretical with certain slope. Only points in the terrace can be connected to the theoretical layer. It is possible to state a maximum length. If no connection is found within the maximum length, the next point will be placed on the stated distance from the current point. The maximum length states the distance in a sideways direction. The format is prepared to enable adding a maximum length in both sideways and diagonal and also as height different from terrain model or theoretical layer.
Follow
Follow points follows a terrain model. A point of the type Follow must be followed by a point that connects to the terrain model, or after another Follow point.
Shelf
Shelf sets how far a terrain model shall be followed.
Offset value
To the upper right in the dialogue you can set an offset value for the staring point on selected outer slope. Offset values can only be set for outer slopes in the terrace layer.