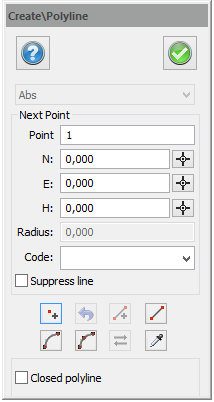
Create polyline
Drawing|Polyline
Shortcut key Ctrl + L
Create Polyline
Enter the co-ordinates either in the dialogue box or directly on screen. If you are using the dialogue box click OK to continue to the next point. When the polyline is finished click Done.
Drawing with slope
You can draw a line with a slope by entering a slope like 1% or 1:100 into the height window. The first point in your polyline cannot have slope as it is a starting point of the line.
dialogue explanations:
Add
When you type in co-ordinates click Add after each point. If you click OK twice for the same co-ordinates you will get two points at the same spot.
Finish
When the line is completed click Finish. This will terminate the command. You can also press the F2 button.
Undo
Undoes the last point
Arc
Arc which continues on the last element.
3 Pt. Arc
Arc with three points.
Reverse
Changes direction of line.
Get Style
Copies the style of any other object in the drawing. The style can be the layer name, colour or line type.
Suppress line
Check this box to suppress line or part of line. Double click on node (Shortcut N) to get to the Properties dialogue, to uncheck Suppress line.
Closed Polyline
If you want the line to be closed, i.e. a polygon, check this box.
Construction line
A construction line is not visible in the drawing.
Spline
A spline will create splines of the line (with a rounded shape)
Polygon
Polygon will create a polygon of the polyline.
Filled
If you want this line to be filled with the same colour as the line itself, click in this box.
To draw a polyline with a baseline:
- Select the baseline
- Select the co-ordinates toolbox in Tool box|Co-ordinates.
- Select Draw polyline.
- Enter the co-ordinates directly into the toolbox rather than clicking on every co-ordinate. You can opt to enter true co-ordinates directly into the Draw polyline box. Enter the co-ordinates for the baseline function by entering them in the co-ordinates box. Enter delta co-ordinates from the last point in the baseline and the distance and bearing from the last point, by selecting the relevant set in the co-ordinates box. After each point press Enter while you are still in the box. You can then select another type of input data for the next point.
- When the polyline is completed, click Done in the Polyline dialogue box.
The point number will increase one step at a time. If you enter 100 for the first point in the polyline, the next point ID will be 101. If you enter 100.01 the next number will be 100.02.
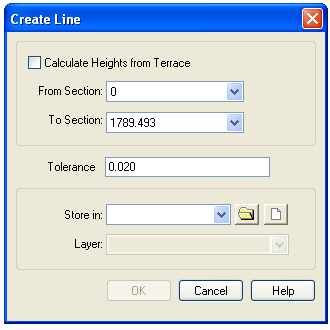
Create lines in drawing from several elements in calculated section
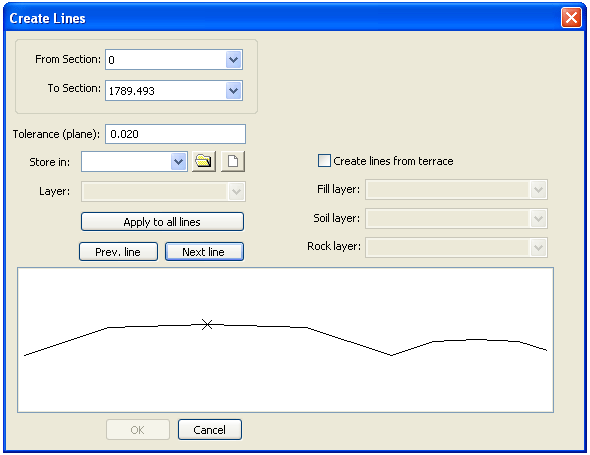
The command is available when you work with a calculated section and activates in the menu under Create | Create multiple lines in drawing.
The command works as Create polyline in drawing in the same menu, the difference is that multiple lines can be created at the same time. You must decide which layer to use for each created line. If no layer name is selected, the line will not be created. Select line by clicking "Prev. line" and "Next line". "Apply all lines" applies all lines in selected layer.
Create line with radius
From Create | Create line in drawing and Create | Create multiple lines in drawing you are able to set a tolerance. The tolerance decides how much the created lines can differ from a perfect line. A perfect line is in this case a line which is calculated with an infinite small interval. For example, if the tolerance is set to 0.02, no part of the created line can be created longer than 2 centimetre from the perfect line. The tolerance only refers to deviations in plane. The heights for the point in the created line are interpolated between the calculated sections. The tolerance is not used when lines are created from the terrace.